Notes
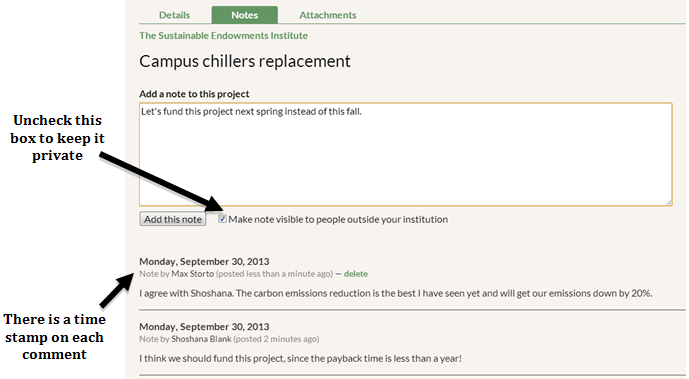
Once in the Project Details page, click on the Notes tab near the top of the page. Add notes to your projects to provide additional project details or communicate with others at your institution. If your project is marked as “Completed” and becomes visible in the Library to other GRITS users, the notes you make will also be visible to others unless you uncheck the box below the notes field before saving them. Notes that you choose to only make visible to users in your own GRITS account will be labeled as “private notes.” You may use Markdown syntax in your notes, (see http://en.wikipedia.org/wiki/Markdown for details). You can delete your own note at any time.

Cover Photo/Attachments
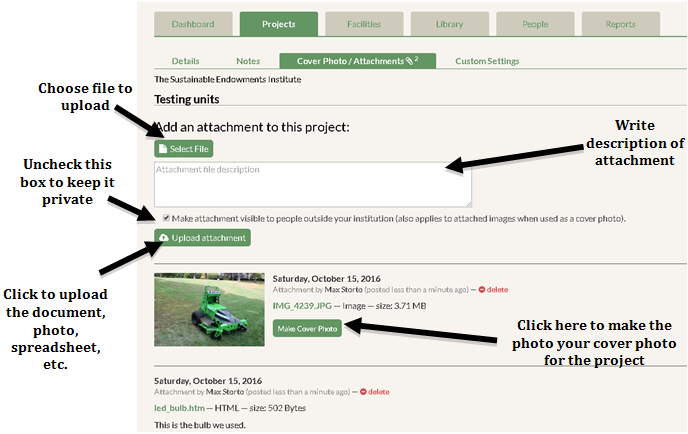
Click on the Attachments tab just to the right of the Notes tab. Add attachments to your projects in almost any format: Word documents, Excel spreadsheets, PDFs, JPEGs, and more. Some helpful attachments could be project photos, a request for proposal (RFP), bids received from contractors, raw energy data including utility bills, invoices paid, or PDFs of technical manuals for specific installed systems. You can make the attachment visible to all GRITS users or only to people at your institution (labeled as a “private attachment”), and you can delete your own attachment at any time. Files of up to 75MB can be uploaded.
If you have attached a photo to the project, you can click “Make Cover Photo” to have that photo appear on this Project Details page as your cover photo. This is a good way to sum up the project in a photo and have others see the photo immediately when clicking into the project. It is also great for other institutions to be able to view your cover photo when clicking on the project from the Library. If the photo was uploaded as an attachment that is only visible to your institution, then it will be a private cover photo that only appears for you and your colleagues.

