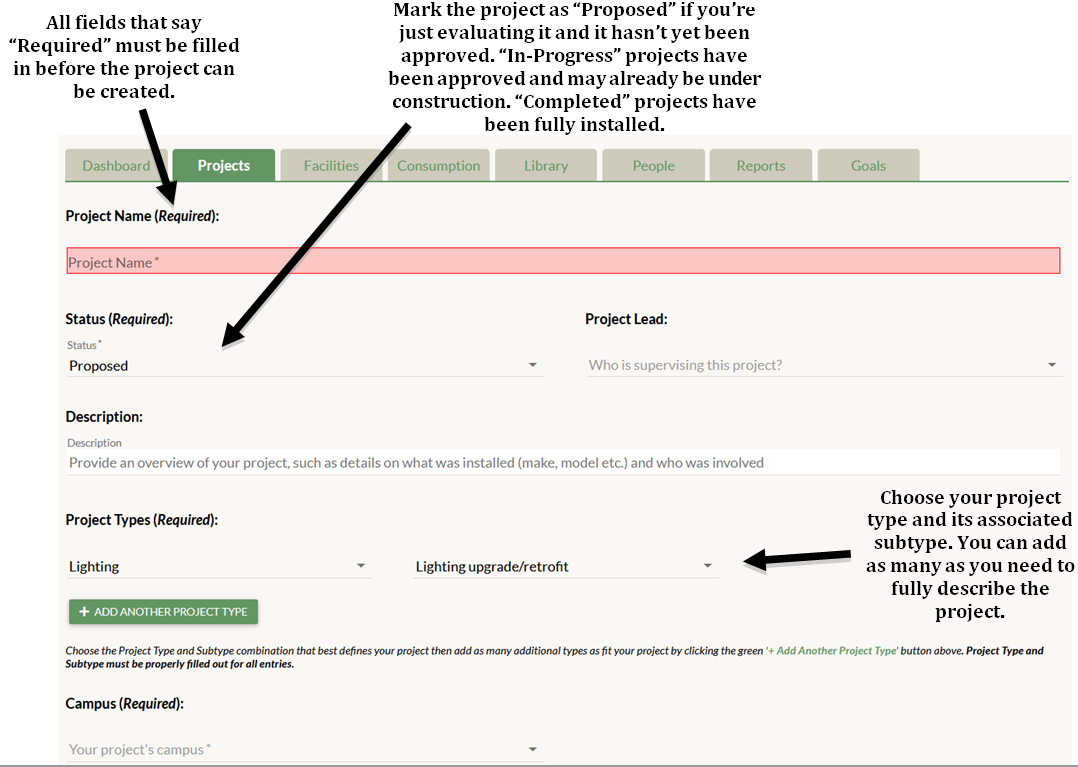
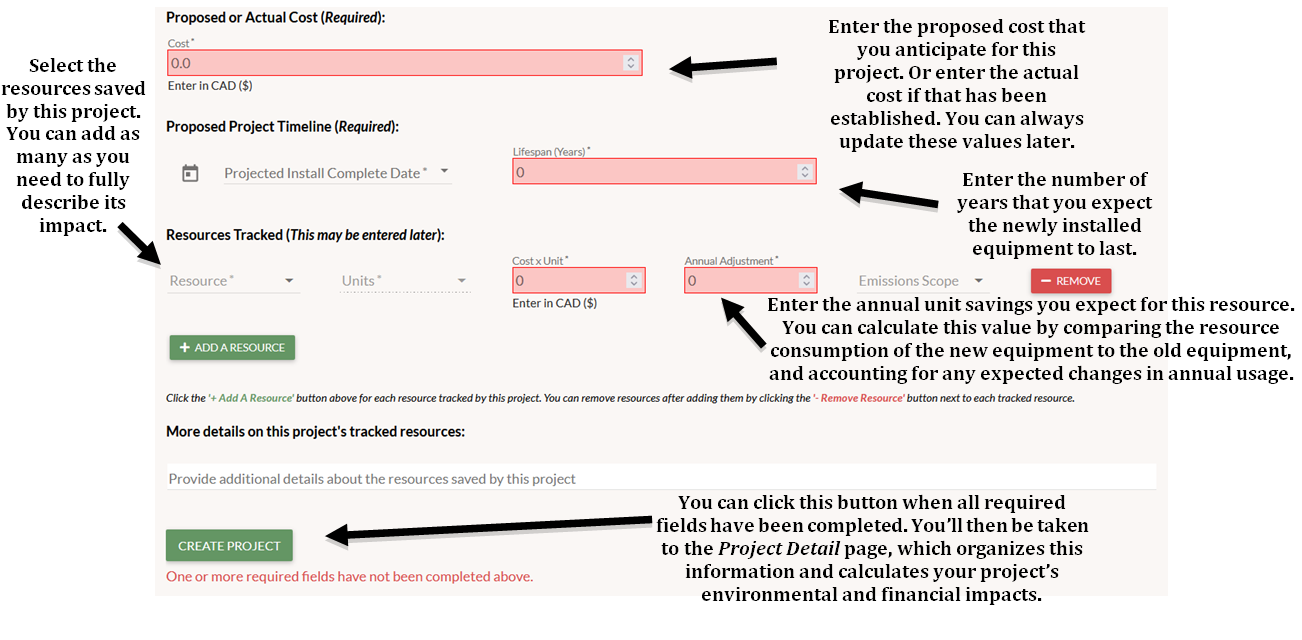
Click “Add Project” at the top of the Projects tab to enter data for a project that is not yet in GRITS. All fields that include the word “Required” need to be filled out before you can click the “Create Project” button at the bottom of the page. Required fields may also have a red color that turns white when relevant and sufficient data has been entered (e.g. a project description that meets the minimum character requirement). You can also fill in the non-required fields on this page if you have that information readily available.
The amount of required information is based on the project’s status. If you mark the project as “Proposed” or “In-Progress,” the required fields are Project Name, Status, Project Type and Subtype, Campus, Proposed or Actual Cost, Project Timeline, and Lifespan. If you mark the project’s status as “Completed,” the Description and Resources Tracked sections also become required.


The following list explains each data entry field that you can use to describe your project. Please note that the “Buildings” and “Measurement and Verification Methodology” fields do not appear on the Add Project page, and only becomes available on the Project Detail page after you have created the project.
- Status – Indicate whether the project is Proposed, In-Progress, or Completed. As time goes on, make sure to update the status of the project, changing it from “Proposed” to “In-Progress” once it has been approved for funding. Once the project construction or installation has been completed, you can change the project’s status to “Completed”.
- Project Lead – Select the person that is leading the implementation of this project. The drop-down menu will have names of everyone from your institution with a GRITS account, so if the Project Lead does not have a GRITS account yet, add them. You can only designate one Project Lead per project.
- Description – In the Description section you can add additional information about the project that would be useful to other parties using GRITS. You should indicate the products being installed here, such as the make and model of lighting products, the scale of the project, the size of the project space, and anything else that describes “what happened” when implementing the project.
- Note: The Description must be at least 50 characters long and should provide sufficient context to explain the project, including for example the number and types of equipment installed.
- Institutions often have a keyword or account number associated with certain projects as a way to group them together. You can include that information in the text fields on the Project Detail page, such as in the Description section. There is a search bar in the upper right corner of the Projects tab where you can search for these keywords or numbers, and only projects that contain that information somewhere in their Project Detail page or in their title will show up in your search.
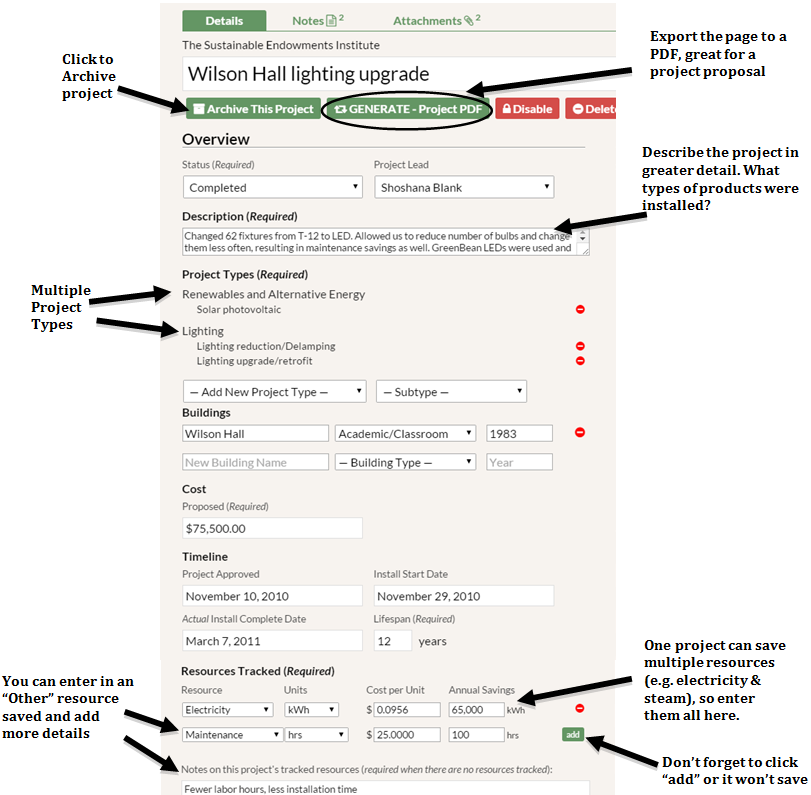
- Project Types – You can select from the 14 Project Types and 121 Project Subtypes that best define your project. Click on “Add new project type”. First choose the Project Type in the left drop-down menu (e.g. Lighting). This choice will update the right drop-down menu to include only Project Subtypes that fall under the chosen category. After choosing a Project Type, select the Project Subtype that best fits your project (e.g. Lighting Controls). A project can have multiple Project Types and Subtypes associated with it. Click “add” to add the Project Type, then you can add additional project types and subtypes.
- Note: When you select the “Renewables and Alternative Energy” resource type, the Resources Tracked section below will adjust to allow you to enter the new source of energy being used (called “RE/Alt Energy”) as well as the old energy source being displaced (called “Replaced”). These options will appear under a new “Resource Type” field that appears as the first field under the Resources Tracked section. GRITS subtracts the cost and emissions figures of the Replaced resource from those of the RE/Alt Energy resource to determine the project’s energy, financial, and carbon savings. All of these numbers are entered as positive numbers (unlike in the case of increasing resource use mentioned in a sub-bullet under “Resources Tracked” below).
- Example: A user entering a solar energy project might select electricity as the “RE/Alt energy” resource and kWh as the unit of measurement, and then enter a $0 cost per kWh and a 25,000 kWh annual adjustment (the amount of kWhs they expect to generate each year). They would set the solar electricity’s emissions factor to 0 since it is a zero-emissions energy source. The “Replaced” resource would also be electricity (to indicate that grid electricity is being replaced by solar-generated electricity), with kWh as the unit, the grid electricity price in kWh (found on your utility bill, likely $0.10-0.20), and an annual adjustment equal to the amount listed for the generated electricity (25,000 kWh).
- Note: When you select the “Renewables and Alternative Energy” resource type, the Resources Tracked section below will adjust to allow you to enter the new source of energy being used (called “RE/Alt Energy”) as well as the old energy source being displaced (called “Replaced”). These options will appear under a new “Resource Type” field that appears as the first field under the Resources Tracked section. GRITS subtracts the cost and emissions figures of the Replaced resource from those of the RE/Alt Energy resource to determine the project’s energy, financial, and carbon savings. All of these numbers are entered as positive numbers (unlike in the case of increasing resource use mentioned in a sub-bullet under “Resources Tracked” below).
- Buildings – Type the name of the building that the project takes place in. GRITS will automatically predict the building name if you have entered it into the system before. Select the type of building and type the year in which the building was constructed. If the project was not in a building, select “Other/including Non-building structure”. The building year is important when comparing efficiency projects that occurred in buildings with varying ages. You can add multiple buildings to a project after clicking “add” on each new one that you enter.
- Proposed or Actual Cost – The cost of the project when first proposed. This will be the assumed project cost for calculations on this page until a “Project Expenditure” transaction is entered for this project. The sum of all expenditure transactions is taken to be the actual cost of the project.
- Note: If the Proposed or Actual Cost is less than $5.00, you will need to write a short explanation (at least 20 characters) about why the project is essentially cost-free in the box that appears directly below.
- Project Approved – The date that the project was approved. Note: this will not appear if the project is still in the Proposed phase.
- Install Start Date – The date that the project started installation. Note: this will not appear if the project is still in the Proposed phase.
- Actual Install Complete Date – The date that the project installation is completed. This will be Projected Install Complete Date until the project is in the Completed status.
- Lifespan – The amount of time the project will efficiently function before replacement. For some products, like lighting, there is a known lifetime for how long the product is expected to last. Lifespan estimates are most likely to come from the facilities/physical plant experts at your institution. Lifespan should be for the underlying technology, for example, lighting fixtures or ballasts and not the bulb; this is true except in cases where only new, more efficient bulbs are being installed and no fixtures are being replaced.
- Resources Tracked – Select the resource being tracked, the unit the resource is measured in, the cost per unit, and the annual resource savings expected. For example, if you are saving electricity, and select kWh for your units, then the “Cost per Unit” would be the price per kWh and the annual savings would be kWh savings estimated for an average year from this project.
- If the project has savings in maintenance and labor time or another resource that is not listed, you can add these savings. To indicate that the project saved maintenance time or money, choose “Maintenance” as the resource. The units could either be hours, and you can list what the cost of labor was per hour, or the units could be “other”. If the project saves another resource (e.g. allows you to purchase fewer paint cans) you can indicate “Other” as the resource with “other” units. Then you can list what you are actually saving (e.g. paint cans) in the “Notes on this project’s tracked resources” text box below.
- If your project is saving one resource (e.g. oil) and using an additional resource (e.g. natural gas), you can enter the new resource being consumed with a negative annual savings number. GRITS will add this increased usage to your resource savings, and you will see fewer annual resource and financial savings in the Annual Tracking Data table on the Project Detail page.
- When adding additional tracked resources on the Project Detail page, you need to click the green “add” button to the right of the new resource to save it.
- More details about how GRITS handles renewable energy projects can be found under the “Project Types” bullet above.
- Note: If the project will not be saving any resources, you can explain why with a short explanation in the provided box labeled “Please explain why this project is not tracking any resources”.
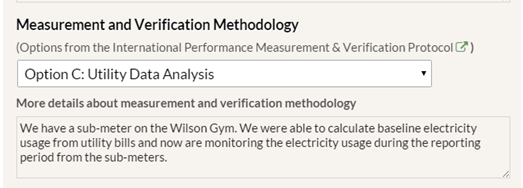
- Measurement and Verification Methodology – In this section you can indicate how the savings are measured. This information is important when comparing projects across your institution and other institutions as it allows you to see what methods were used to report the savings data. You can indicate one of the four M&V options from the International Performance Measurement and Verification Protocol (IPMVP). To find out more about this protocol and the four options, you can click on the small box with an arrow for the link to a section of this report: International Performance Measurement and Verification Protocol: Concepts and Options for Determining Energy and Water Savings. Volume I, EVO-10000 -1:2012, Efficiency Valuation Organization.
-
- Option A—Retrofit Isolation with Key Parameter Measurement: Savings are determined by field measurement of the key performance parameter(s) which define the energy use of the ECM’s affected system(s) and/or the success of the project.
- Option B—Retrofit Isolation with All Parameter Measurement: Savings are determined by field measurement of the energy use of the ECM-affected system.
- Option C—Utility Data Analysis: Savings are determined by measuring energy use at the whole facility or sub-facility level.
- Option D—Calibrated Computer Simulation: Savings are determined through simulation of the energy use of the whole facility, or of a sub-facility.
-
Once you click the “Create Project” button at the bottom of the Add Project page, you will be brought to the Project Detail page where you can add additional information like the building(s) where the project is taking place and the measurement and verification methodology used (if any). The Project Detail page contains all information pertinent to each individual project and displays the project’s energy, financial, and carbon savings data, which GRITS calculates from the inputs you provided. Notice that the inputs from the Add Project page are on the left side of the Project Detail page while the outputs are on the right side of the page in gray boxes.


